If you would like further assistance after this tutorial, please contact us to schedule an ergonomic assessment or to ask any questions.

Before We Start

The next few steps are informational so please refrain from adjusting your workstation. Once you've read them, proceed to the Adjust As You Go section.

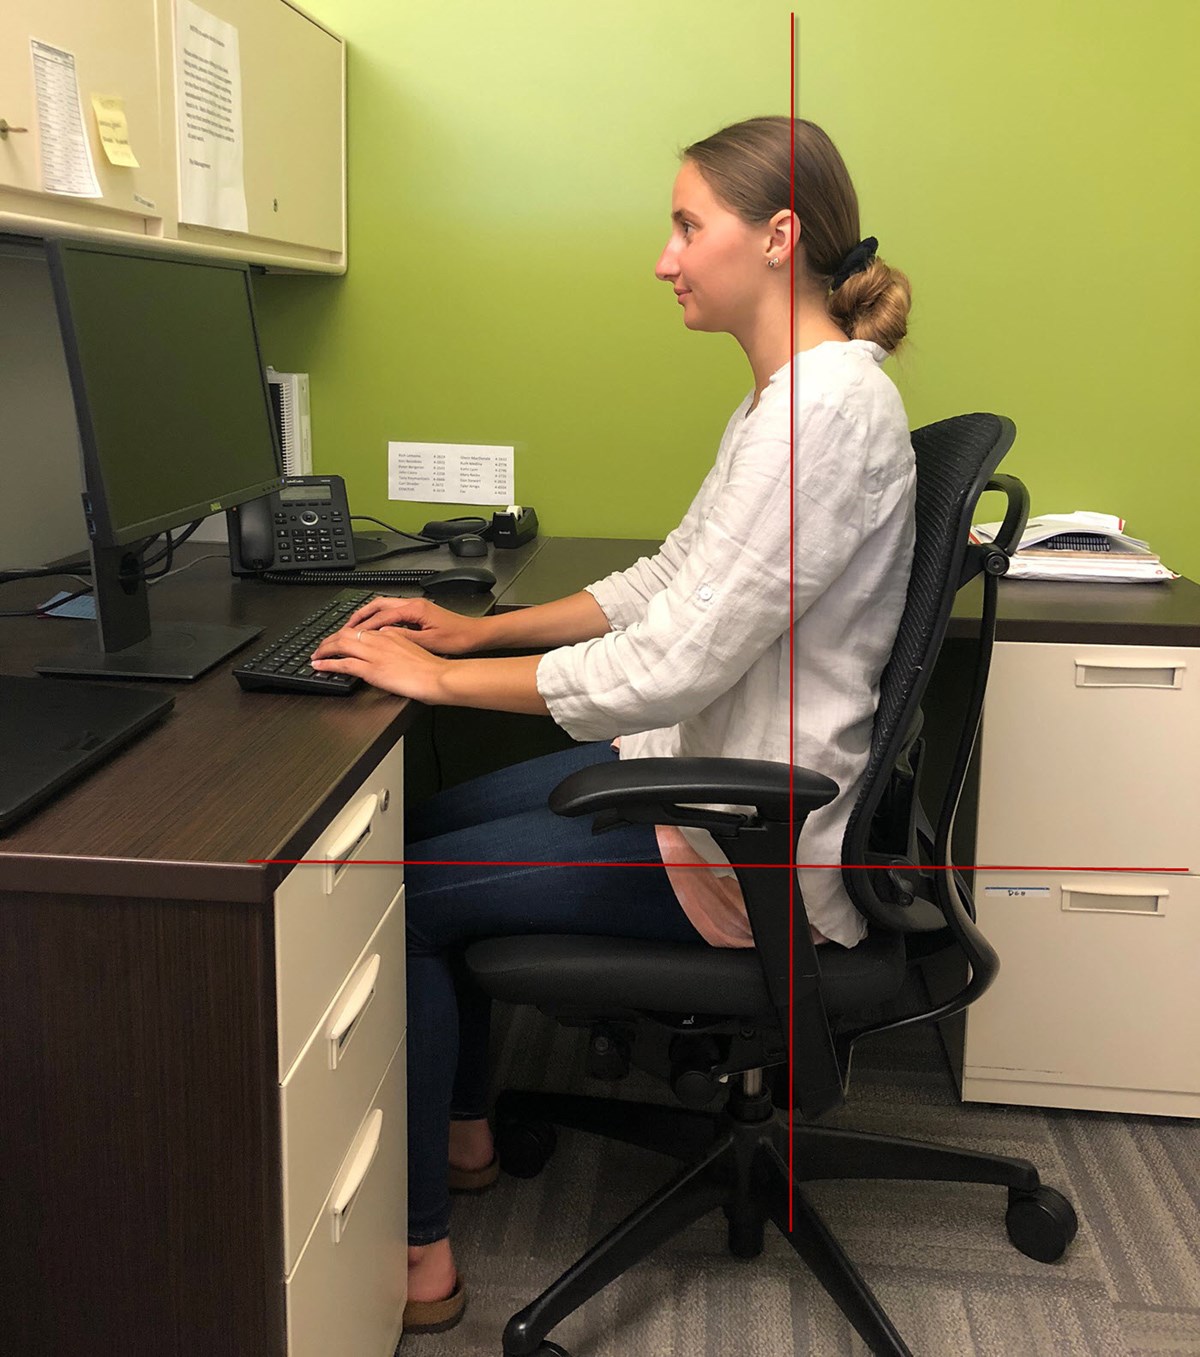
  • Reclined posture
  • 90° posture

Each have their own benefits and draw backs.

Adjusting postures periodically may be most beneficial since they may become fatiguing over time.

A person sits in the reclined position at their desk with a 100-110 degree angle between their thighs and torso
  • Relaxed position, back fully pressed against the backrest, and feet placed flat on the floor
    • NO SLOUCHING in this position
    • Ideal angle of back should be ~100-110°

PROS: Non-fatiguing posture. Most of the workday should be in this position.

  • Leaning on backrest lessens the load on the spine
  • Can allow for easier blood circulation

CONS: Does not engage abdominal muscles; over time this could start to weaken core

A female sitting upright in a chair showing 90 degree posture.
  • Back rest locked in place vertically for slight support, core engaged, hips in neutral position and feet flat on floor

PROS: This is the best biomechanical posture for light work.

  • Allows the user to be most engaged in their work
  • Engages muscles in the core and legs
  • Allows for proper curvature of the spine

CONS: This posture can be fatiguing on the core (Abdominals & Erector Spinae).

  • Once fatigue sets in, reset posture to reclined position until rest has been sufficient

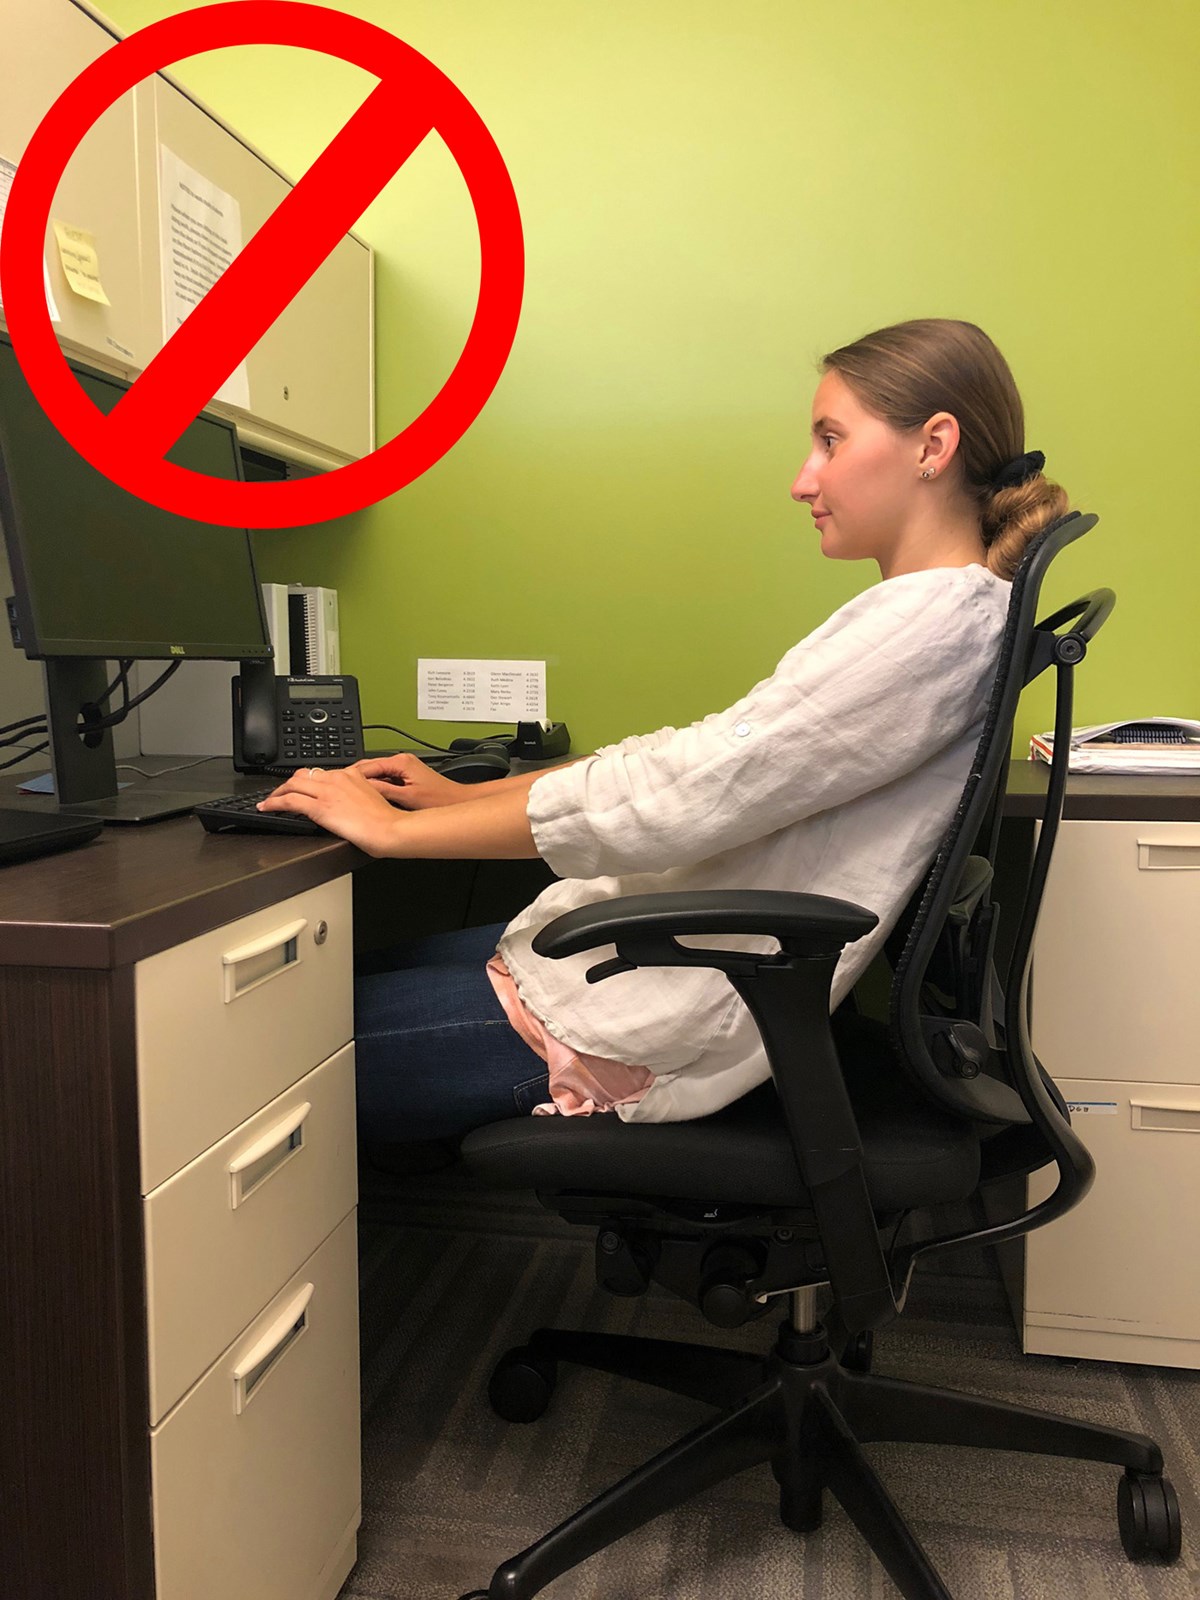
A no sign over a picture of a woman slouching in her chair so that her back is not supported by the backrest.
  • The reclined position may transition to a slouched position over time.
    • Please be mindful of this and re-adjust when you notice your posture has changed.
  • Do not slouch in either position.
  • Slouching may cause back pain over time as it takes the spine out of its natural curvature.
  • To learn more about proper hip and spine alignment follow the link below.

Adjust as You Go!

Video tutorial of the Vontessa chair.

adjustAs you view these next steps, please adjust your workstation according to the recommendation that you believe best fits your setting. If you need further assistance after reviewing these slides, please contact us.

When viewing this page your on mobile device, please click on the arrow to the top right of the title to access the dropdown menu and select another resource.

An empty contessa chair with an arrow pointing to the lever under the right armrest.
  • Adjust seat height so that thighs are parallel to floor and feet are flat on the ground.
  • To adjust seat up or down, use the lever under the right armrest.
  • While pressing lever, stay seated to go down.
  • While pressing lever, stand to bring the seat up.

A female sitting in a contessa chair with two fingers in between her calf and the seat pan.
  • With your back resting on the backrest the thighs should overhang about 2 fingers widths.
  • To adjust the seat pan depth, press the levers under the seat pan on both sides to bring the seat all the way forward.
  • Next, sit on the pan so that you can fit 2 fingers between seat pan and calf.
    • In this position, slide the seat pan back until your back is comfortably against the backrest.

The back of a contessa chair with arrows pointing up and down showing how the lumbar support can be adjusted. The handles to adjust this can be found by reaching behind the backrest on the lower half.
  • To adjust the height of the lumbar support, use the finger grips behind the backrest to lift or lower the support to a comfortable position.
The back of a contessa chair with arrows pointing to the lever that engages and disengages the lumbar support. These levers can be found on the back side of the backrest on the bottom edges near the waste.
  • To adjust the depth of the lumbar support, use the levers below the finger grips to rotate in or out.

A female sitting in a contessa chair pulling or pushing on the armrest showing that the armrest can be adjusted up or down.
  • Adjust arm rest height so that shoulders are relaxed and forearms can lay on armrest.
  • Arm rests should be in line with desk to keep neutral position in the forearms and wrist.
  • Reduces the force on lower back by transferring some of the force to the shoulders.
  • Helps reduce fatigue in the upright posture
    • Abdominals won’t have to hold up as much weight
  • To do this, lift the armrest up all the way up then press it all the way down. Now slowly lift armrest to desired height.
    • No buttons or levers need to be pressed to adjust the armrest height.

The right side of a contessa chair with arrows pointing towards the knob under the seat pan to adjust the resistance of the backrest.
  • To recline the backrest, press the lever under the left armrest once. This will allow free movement of the backrest.
  • To lock in place, press the lever a second time in the desired location.
    • To remove the lock, lean back and click the lever a 3rd time.
  • To adjust the resistance of the backrest, use the rotating grip located under the seat pan on the right side.
    • Rotate to 1 for least resistance and 4 for the most resistance.

  • Keyboard height should be set so that while typing, your shoulders are relaxed while resting on armrests, wrists are flat, and elbows are bent to 90 degrees.
  • Mouse should be adjacent to keyboard, wrists should remain flat and elbows bent to 90 degrees.
  • This will depend on the desk height and whether or not a keyboard tray is used.
  • Gel pads may also be used so that the wrist rests on a soft surface. To receive a gel pad please call EHS at 978-934-2746.

  • When keyboard sits on desk, the desk should be the same height as armrests.
    • If this is not the case after adjusting your chair settings, adjust the height of the desk if possible.
    • If desk height is not adjustable, bring the chair height up and request a footrest.
  • When using a keyboard tray, the desk should be above armrests and armrests should be at keyboard tray height.
  • Legs should have enough clearance under desk to move freely.

A person sits at her desk with their arms extended in front of them so that the tips of their fingers touch the monitor.
  • Place monitor 18-30 inches away from face.
    • A comfortable rule of thumb is to set it an arms length away.
  • When wearing glasses, contacts or no glasses; top of monitor should be in line with eye level.
  • When wearing bifocals, top of monitor should be horizontal from the line where the prescription changes.
  • Monitor should be tilted backwards 10-20° from a vertical position.
    • Same rules apply for laptops.

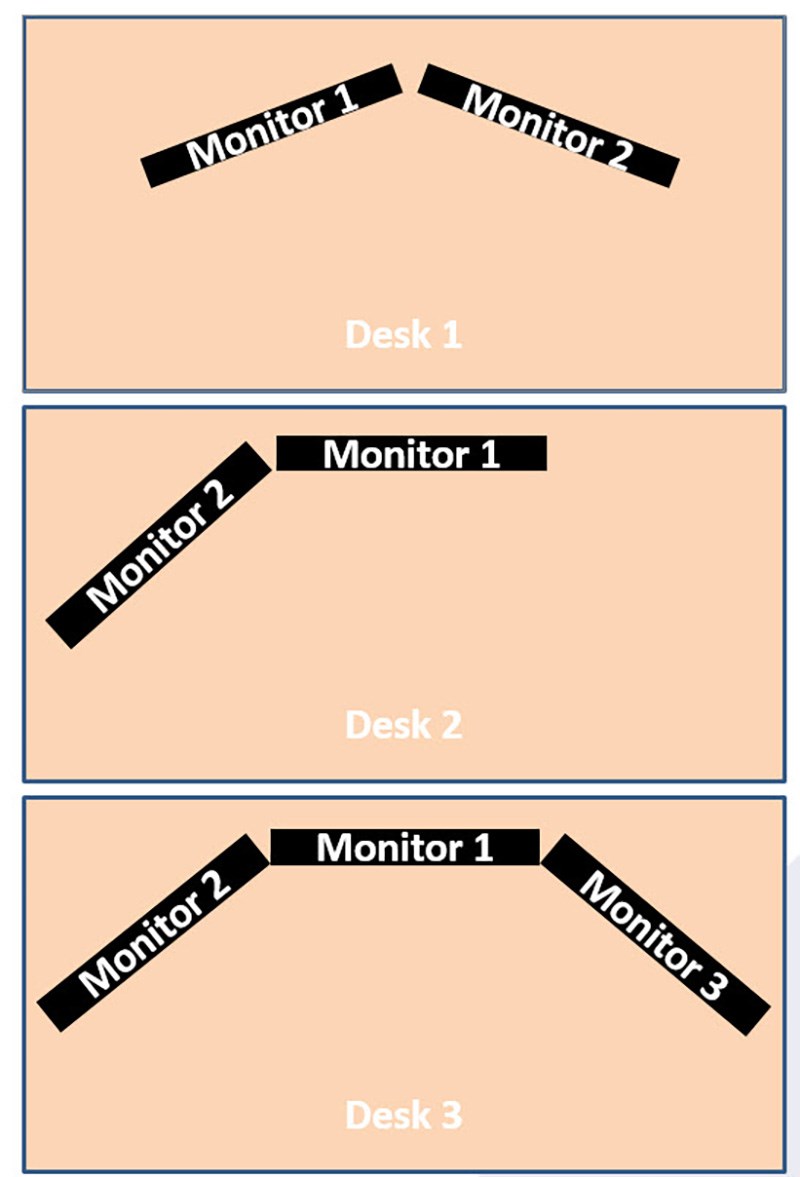
Graphic illustrating multiple monitor ideal locations for ergonomics.
  • If both monitors are used equally, have them meet directly in front of the user. (Desk 1)
    • Create “V” shape between the two monitors.
  • If one monitor is primarily used, then set that monitor directly in front of the user. The other monitor should be angled towards the user on either side. (Desk 2)
    • Side chosen can be preference or based on space.
  • If 3 monitors are used the primary monitor should be directly in front and the other 2 should be at an angle. (Desk 3)

Monitor Settings & Eye Strain

  • Monitor brightness should match room brightness.
    • A good rule of thumb is that the monitor brightness should be set to it’s midrange settings.
    • If the midrange settings make the monitor difficult to read then change the scenery in the office.
    • Turn lights on or off.
    • If there is glare use blinds or curtains.
    • Remove some light bulbs if possible.
    • Substitute overhead lights with soft lighting lamps.
  • Symptoms of eye strain may include headaches and blurred vision.

To avoid these symptoms try some of these tricks in the tabs below.

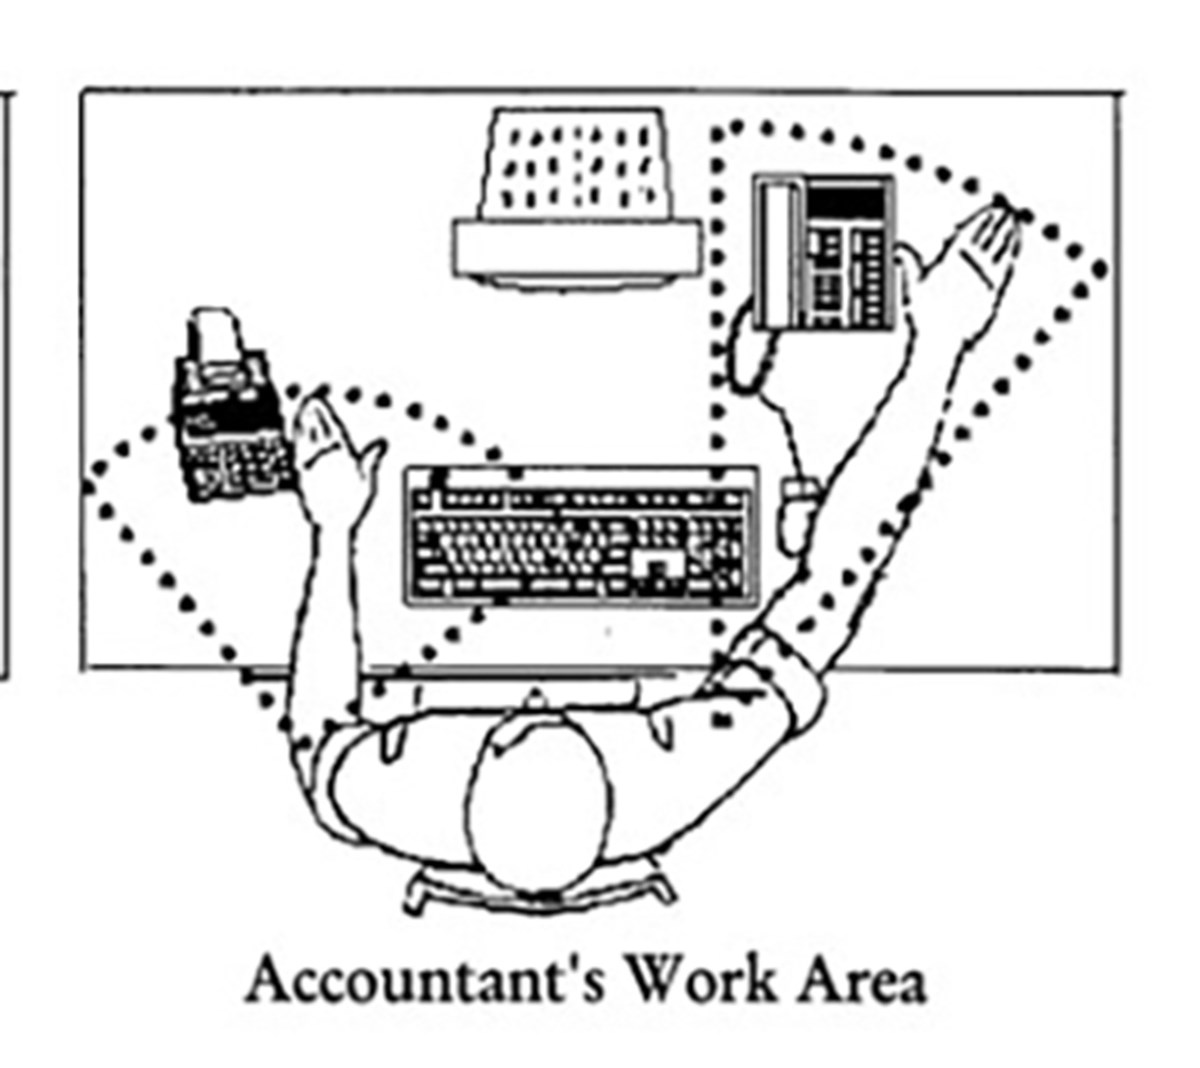
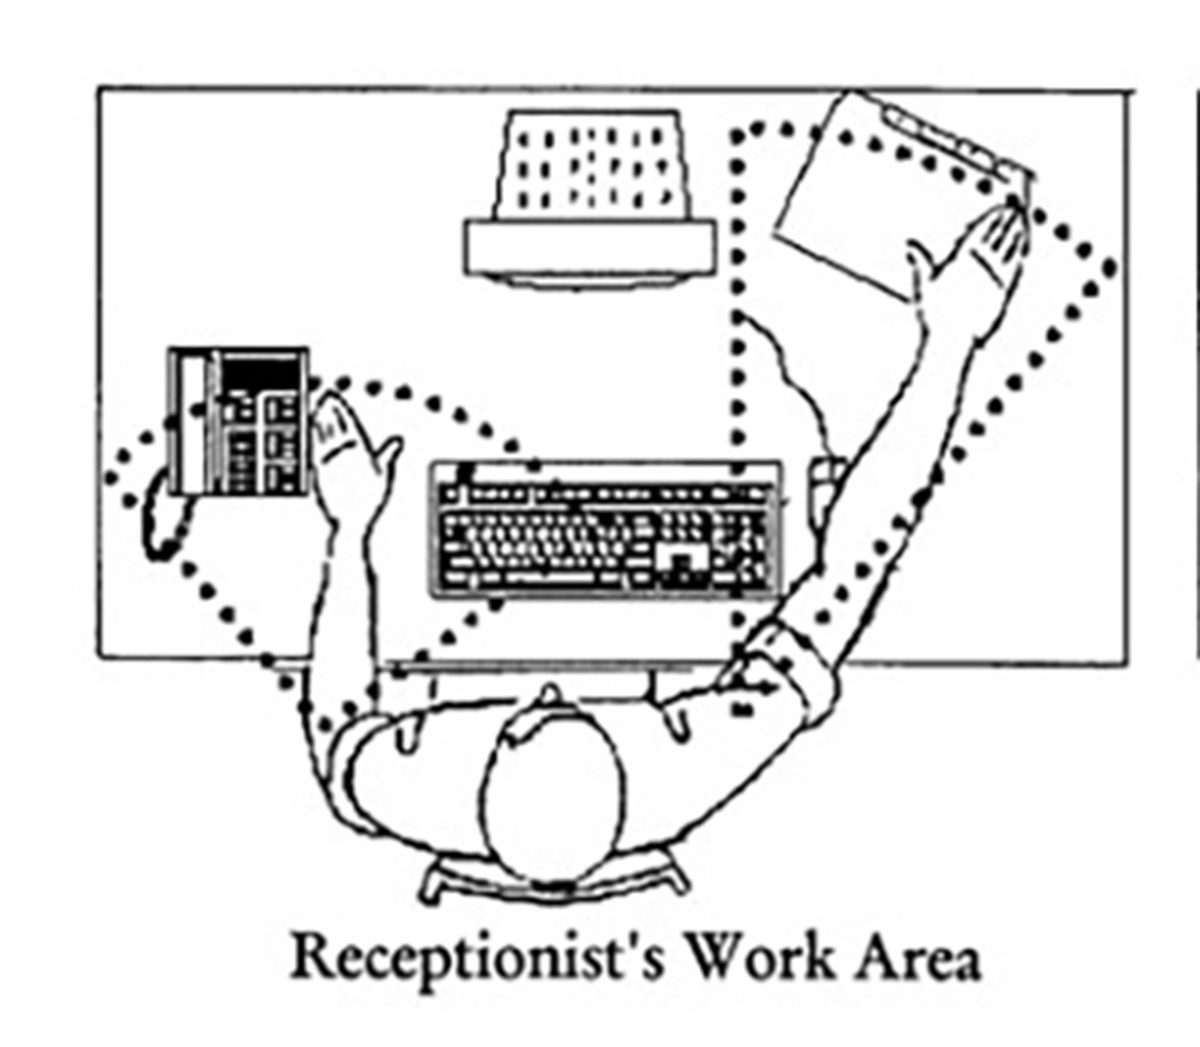
Graphic illustrating work areas - compare and contrast best ergonomics. Prioritizing Your Work Area Each job uses different tools. Organize frequently used tools to be within easy reach. Infrequently used tools should be within reach but far enough that it does not “clutter” your desk. Use drawers and shelves to store items that are not used daily.
  • Each job uses different tools.
  • Organize frequently used tools to be within easy reach.
Graphic illustrating work areas - compare and contrast best ergonomics. Prioritizing Your Work Area Each job uses different tools. Organize frequently used tools to be within easy reach. Infrequently used tools should be within reach but far enough that it does not “clutter” your desk. Use drawers and shelves to store items that are not used daily.
  • Infrequently used tools should be within reach but far enough that it does not “clutter” your desk.
    • Use drawers and shelves to store items that are not used daily.

A no sign over an image of a woman sitting at her desk while using the phone. The phone is being held between her shoulder and ear.
  • Shoulder cradle may cause neck discomfort, especially if phone use is frequent.
  • Headsets or speakerphone are preferred when possible.
    • To receive a headset please call I.T. at 978-934-4357 or EHS at 978-934-2746.

A document holder sits in front of a monitor so a user can easily transfer data from the paper to the computer.

(Document Holder)

  • Reduces frequent neck movement when transferring information from hard copy to computer.
    • To receive a document holder please call EHS at 978-934-2746.

Stretches

Please use these stretches periodically throughout your workday.

A fist is in a clenched position upright.
  • First make a fist and squeeze gently
    • 1-3 second hold
A hand is spread out so each finger is as far away as possible
  • Next open your hands and spread the fingers as far as possible
    • Hold 5-10 seconds
  • Repeat 3 times on both hands

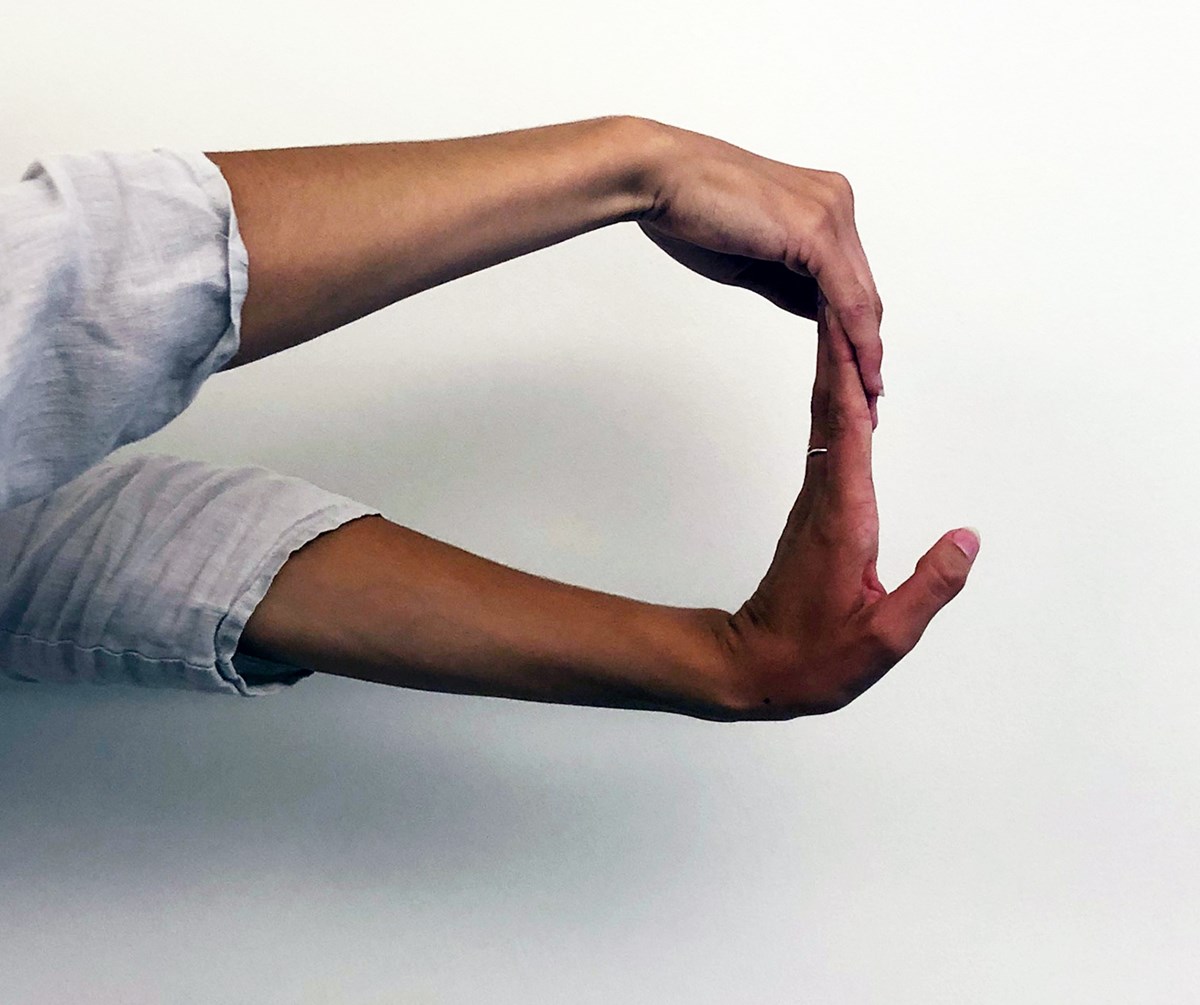
A person extends both arms in front of them. The bottom hand has the palm facing away from them and the fingers pointed towards the ceiling. The top hand is pulling the fingers of the bottom hand towards the body for a stretch.
  • Stick 1 arm out straight
  • Using other hand, grab fingers and pull back gently (Figure 1)
    • Hold 5-10 seconds
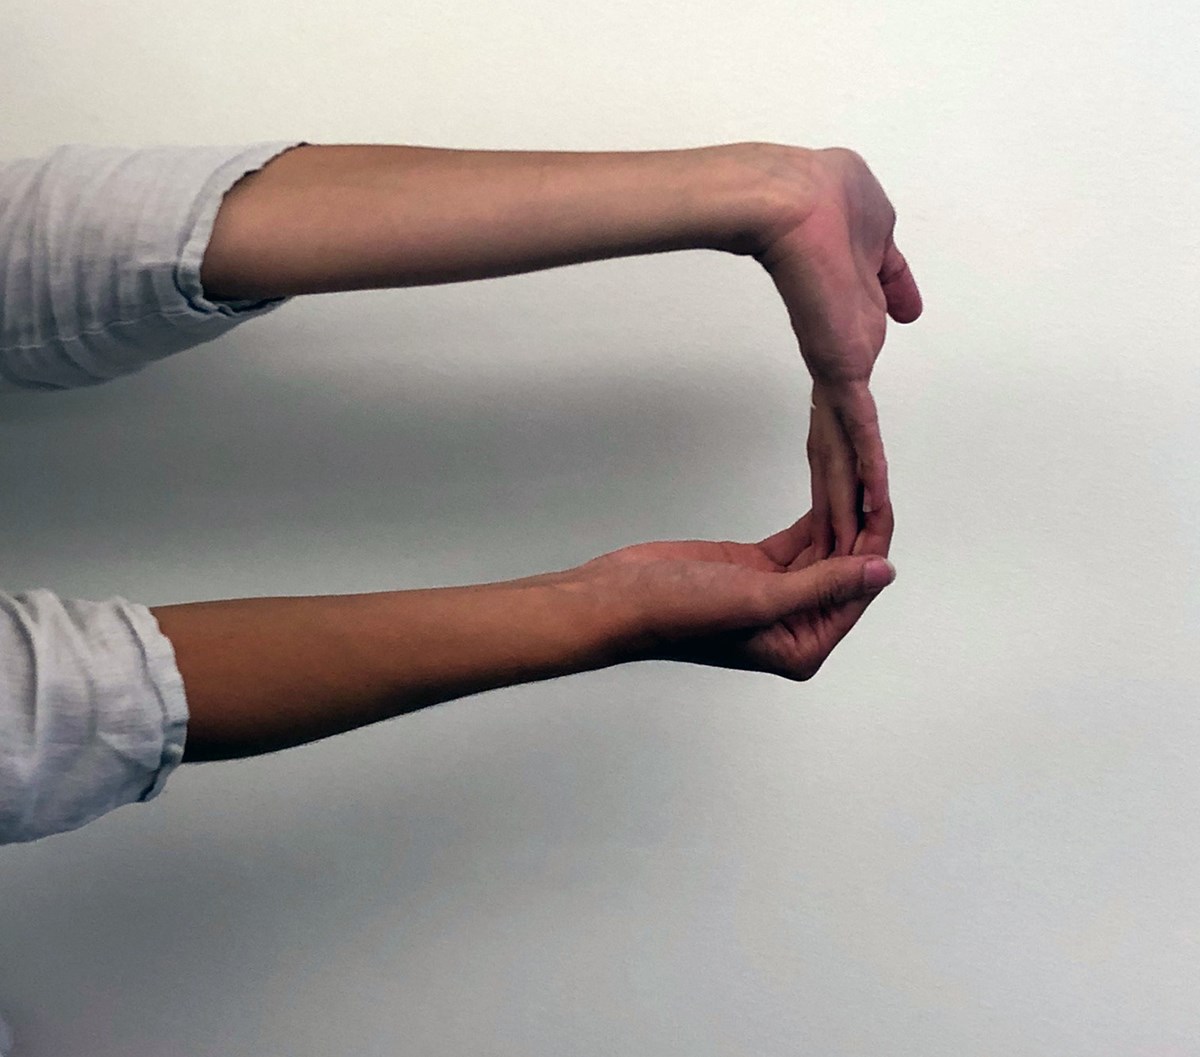
A person extends both arms in front of them. The top hand has the palm facing away from them and the fingers pointed towards the ground. The bottom hand is pulling the fingers of the top hand towards the body for a stretch.
  • For a stronger stretch, flip forearm so that the underside is facing the ceiling
    • Hold 5-10 seconds

A person stands with their right elbow pointed towards the ceiling. Their left hand is pulling the elbow towards the left side stretching the triceps and upper back.
  • Take your right arm and lift it over your head
  • Bend at the elbow so that you touch the left shoulder with the right hand
  • Take your left arm and grab your elbow
  • Lightly pull the right elbow towards your left side
A person stands with their left elbow pointed towards the ceiling. Their right hand is pulling the elbow towards the right side stretching the triceps and upper back.
  • Bend at the ribcage to the left
  • Lightly hold this for 10-20 seconds
  • Repeat on opposite side

A person raises both arms out to their sides while inhaling. Their elbows are bent to a 90 degree angle and the fingers are pointed towards the ceiling.
  • Lift both arms so that forearms are vertical and upper arms are horizontal (similar to the shape of a field goal)
  • Slowly inhale as you try to bring your elbows towards your back
A person lowers their arms while exhaling. As they do this they try to pinch their shoulder blades together while keeping their fingers pointed upward
  • Slowly exhale and lower elbows down and back
  • Repeat 3 times

A person bends their head to the right side. They place their right hand on top of their head and use the weight of the hand to feel a stretch.
  • Tilt your head to the right
  • Use the weight of your right hand to rest on the left side of your head
    • Do not pull down just let gravity do the job
A person bends their head to the left side. They place their left hand on top of their head and use the weight of the hand to feel a stretch.
  • Hold for 5-10 seconds
  • Repeat on left side

A person with their head bent down towards their chest. They interlock the fingers of both hands and place on the back of the head to use the weight of the arms to feel a stretch.
  • Sit upright and look down
  • Take both hands and rest it on the back of your head
    • Do not pull down just let gravity do the job
  • Hold 5-10 seconds
  • Sit Upright and look up